 Decorating your home doesn’t need to be an expensive venture. With a bit of creativity and some DIY magic, you can transform everyday items like plastic bottles into unique decor pieces. Here’s a list of five crafty ideas to repurpose plastic bottles for your room’s decor, proving that style and sustainability can go hand-in-hand.
1. Plastic Bottle Planters Unleash your inner green thumb with plastic bottle planters. This is not only eco-friendly but also adds a refreshing touch to any room.
- Materials:
- Clean plastic bottles
- Acrylic paints and brushes
- Yarn or twine
- Soil and plants or herbs
- Instructions:
- Cut the plastic bottles in half.
- Paint the outside with designs of your choice.
- Once dry, tie around the neck with yarn for hanging or set on a flat surface.
- Fill with soil and your chosen plants.
2. Decorative Bottle Lights Light up your room with a whimsical touch by crafting a decorative bottle light.
- Materials:
- Plastic bottles
- LED string lights
- Cutter and scissors
- Instructions:
- Clean the bottle and remove any labels.
- Cut an opening at the bottom to insert the lights.
- Thread the LED string lights inside the bottle.
- Plug in or switch on the battery-operated lights for a glowing effect.
3. Chic Storage Containers Stay organized and stylish with custom-made storage containers from plastic bottles.
- Materials:
- Large plastic bottles
- Zipper or Velcro
- Glue gun
- Decorative materials (fabric, paint, stickers)
- Instructions:
- Cut the bottles to the desired height.
- Attach a zipper or Velcro to the cut edges.
- Decorate the outside with fabric, paint, or stickers.
- Use them to store craft supplies, small toys, or desk accessories.
4. Intricate Wall Art Create a statement wall piece by assembling plastic bottle cut-outs into a mesmerizing design.
- Materials:
- Plastic bottles of various sizes
- Paints and brushes
- A large canvas or wood panel
- Glue or a hot glue gun
- Instructions:
- Cut the bottom of plastic bottles to create flower-like shapes.
- Paint each ‘flower’ in different colors or a single palette.
- Once dry, glue them onto the canvas or wood panel in a pattern you like.
5. Customized Curtain Fashion a one-of-a-kind curtain with plastic bottle bases for a funky and colorful addition to your room.
- Materials:
- Bottom parts of plastic bottles
- Paints and brushes
- Strong thread or fishing line
- Needle
- Instructions:
- Cut the bottoms off several plastic bottles.
- Paint and decorate as desired.
- Once dry, pierce a hole through each piece and thread them onto the line.
- Hang them in your window for a curtain that catches the light and creates colorful reflections.
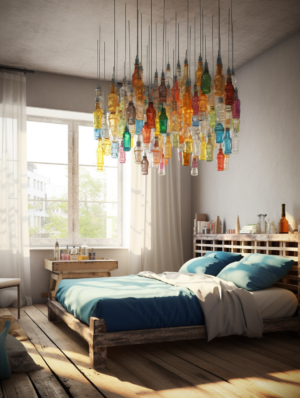
6 Ceiling Art from Recycled Plastic Bottles
- Instructions:
Gather Your Materials
You’ll need to collect a few materials and tools:
- Plastic bottles: Collect various shapes and sizes for diversity in your design.
- Acrylic paints (Optional): Choose colors that complement your room’s decor.
- Brushes and painting supplies: For applying paint to your bottles.
- Cutter or scissors: To cut the bottles into desired shapes.
- Drill: For making holes to hang the bottles.
- Fishing line black or transparent: To suspend the bottles from the ceiling. Hercules has some amazing fishing line colors
- Ceiling hooks: Ensure they’re sturdy enough to hold your art piece.
Preparation and Planning
Step 1: Clean the Bottles
Ensure all bottles are clean and dry. Remove labels and any sticky residue, as you want a smooth surface for painting.
Step 2: Design Your Art Piece
Sketch a rough design of your ceiling art. Consider the size of your space and how densely packed you want your art piece to be. Think about whether you want a symmetrical design or a more organic, flowing pattern.
Crafting Your Art Piece
Step 3: Cut and Shape the Bottles
Using a cutter or scissors, carefully cut the plastic bottles into your desired shapes. You can create spirals, flowers, or even abstract shapes. This step is where your creativity really shines.
Step 4: Paint the Bottles
Paint your cut bottle pieces in the colors of your choice. You might opt for a monochromatic scheme, a vibrant palette, or even a metallic finish for a more sophisticated look. Allow the paint to dry completely.
Step 5: Assemble and Hang
Drill small holes in your painted pieces and use fishing line or transparent thread to tie them together. Attach the other end of the thread to ceiling hooks strategically placed according to your design plan. Adjust the length of the threads to create depth and dimension in your ceiling art.
Tips for Success
- Lighting: Consider the lighting in your room. Natural light can transform your ceiling art throughout the day, casting colorful shadows and highlights.
- Balance: While asymmetry can be visually interesting, ensure your piece is balanced so it hangs correctly without tilting.
- Safety: Be cautious when working with sharp tools and ensure your ceiling hooks are securely installed to prevent accidents.
FAQs
Q: How can I make my ceiling art piece more durable? A: Applying a clear acrylic sealer over the painted bottles can protect them from dust and fading, making your art piece more durable.
Q: Can I create a theme with my ceiling art? A: Absolutely! Themes like the ocean, with shades of blue and green, or a floral garden with brightly colored flower-shaped bottles, can add a cohesive element to your decor.
Q: Is there a way to make the ceiling art easier to remove or change? A: Yes, instead of directly attaching the art to the ceiling, you can hang it from PVC pipe frame or even a hula-hoop. This way, you can easily remove or replace it as desired.
Creating ceiling art from recycled plastic bottles is a fun, eco-friendly project that not only enhances your home decor but also contributes to a more sustainable lifestyle. With a bit of creativity and effort, you can transform ordinary plastic bottles into a stunning art piece that captures the imagination and brings a sense of pride every time you look up.
Conclusion: These DIY room decor ideas not only breathe new life into plastic bottles but also add a personal touch to your living space. By repurposing materials, you’re crafting a home that’s as unique as it is environmentally conscious. Give these projects a try and take pride in your resourceful and stylish creations.
For more DIY tutorials and upcycling ideas, visit budget-friendly design blogs and engage with online DIY communities for endless inspiration.