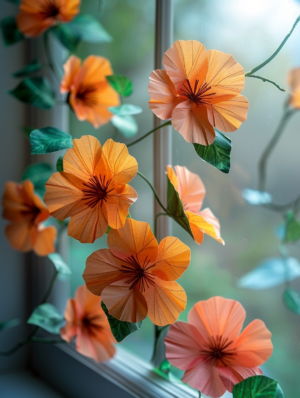
You don’t need a grand budget to transform your home, nor do you need to be particularly talented at DIY. simple and beautiful wall decorations can be created easily using everyday materials and a little creativity. In this article, I will explain how to turn simple paper into stunning hanging flower decorations, proving how simple materials can add instant character and warmth to your home.
Introduction to Paper Craft
Paper craft is a versatile DIY home decor medium that does not require professional art skills, making the prospect of a homemade hanging flower decoration a Platonic DIY dream. Also known as origami and paper quilling, paper crafting is an art form that produces objects or art from paper by folding, cutting, gluing and layering it. To keep this article simple, we’ll be concentrating on the art of hanging flower decorations.
Materials Needed
- Coloured or patterned paper: Use a thin paper such as construction, crepe or origami to make it easier to manipulate, and for a light, delicate look.
- Scissors: For cutting the paper into shapes and petals.
- Glue: A glue stick for precise application or PVA glue for a stronger bond.
- String or fishing line: To hang your flowers.
- Pencil: For tracing shapes or sketching designs.
- Ruler: Helps achieve precise measurements and folds.
- Paper clips or clothespins: To hold pieces together as they dry.
Step-by-Step Guide to Creating Hanging Paper Flowers
Step 1: Choose Your Flower Design
Decide on a flower shape based on your skill level and the look you want to achieve.A daisy or simple tulip shape is probably best for a novice crafter while a rose or peony shape could be more challenging.
Step 2: Prepare Your Paper
If you want a flower-like outcome (in case the above didn’t make that clear), it’s a good idea to cut your paper first into strips, or squares, or similar, petal-shaped sections. Press a pencil in next to a ruler to help make your cuts. Do this before you get out the scissors.
Step 3: Create the Petals and Leaves
- Simple flowers: Cut paper into petal shapes. Variation is easy to obtain as you change the size or shape of the petals.
- Complex flowers: Large, non-detailed shapes in lower layers, smaller, more detailed shapes added above.
Cut out leaves from green paper. Draw some veins on them with a darker green felt-tip or pencil for added realism.
Step 4: Assemble Your Flowers
First, glue the petals together at the base and arrange around a central point as flower petals would naturally do. With more complex flowers, you might have to shape your petals by bending or curling them before putting them together.
After putting your flower together, glue leaves onto the back or stem of your flower. Make sure everything is dry before you move on.
Step 5: Prepare to Hang Your Flowers
Cut a length of string or fishing line to hang at your preferred length, then knot it at one end to make a loop for easy hanging.
Step 6: Attach Flowers to the String
Paste the back on to the string, spacing them out if you’re making a garland or using one flower for a simpler decoration. Pin the flowers in place with paper clips or clothespins while drying.
Step 7: Hang Your Flowers
Once it’s dry, you can either use your flower decorations to liven up a bare wall, hang them from the ceiling or position them in front of a window for an eye-catching display.
Additional Tips and Ideas
- Play with Paper Types: Different papers can make different textures and effects. Mixing paper types in the same project can add depth and interest.
- Incorporate Lighting: Integrate small LED lights into your garlands for a magical evening glow.
- Mix sizes: Make a visual feast with oversized delphiniums lolloping amid clumps of low-growing chives.
- Colour Themes: If your wardrobe is kept to a limited palette of colours, then you’ll greatly reduce the complexity of the ‘fit issue’ AND your wardrobe will seem coherent and unified. On the other hand, if you aren’t fussed about that sort of thing, then mix it up with vivid, novel colours. The most successful mix will be to throw in a lot of unrelated bright and contrasting colour combinations – the ‘mismatched’ look.
FAQs
Q: How can I make my paper flowers last longer? A: Keep them away from direct sunlight