DIY wall art is great for adding charm to your home without a massive investment in the material or labour. Anyone who is interested in raw textures and modern minimalistic art can appreciate textured wall art projects that push the boundaries of what can be made with everyday materials like Mod Podge (cream glue and sealer), sawdust, steel wool, polyester mummy fill, popcorn ceiling, used shoe polish, food wrap, wallpaper paste and the list goes on. In this article, we are going to take you through an easy step-by-step process to make three thrifty, unique DIY textured wall art projects to transform your living space into a unique personalized haven.
Introduction to Textured Wall Art
In textured wall art we find any artworks that have a certain physical dimensionality to them, so a piece of art with, say, raised elements that are not planar (like tactile patterns, 3D objects or mixed media compositions to general layering etc) differs in that way from the surface it’s on. Such pieces of art are great to introduce a feeling of warmth and character to modern or minimalist interiors and upgrades due to their unique looks.
The Appeal of DIY and Minimalism
Besides being cost-effective, doing it yourself gives you free reign over your decorative style. Who wants a cookie-cutter home anyway? Say it with me: Less. Is. More.
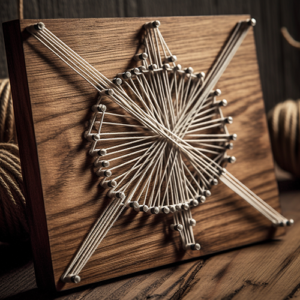
Project 1: Textured String Art
Turning string, nails, and wood into a piece of textured art that can spruce up virtually any wall: learning to create your own textured string art for your home is easy with this DIY project. Whether you’re a novice or an experienced crafter, this guide will walk you through creating something beautiful with your own two hands and a set of supplies. In this step-by-step tutorial, you’ll learn how to create your own textured string art to add a personal touch to any space. No need to worry: it’s not complicated! This trendy project is accessible for crafters of all levels, and the finished product can be stylish and modern.
What Is Textured String Art?
Textured string art is a form of ornamental craft where coloured string, yarn or twine is woven around nails in a grid to form geometric patterns or representational designs. The 3D quality of the woven and layered strings adds visual interest and texture that makes the decorative art form popular with devotees of the handcrafted look.
Materials You’ll Need
- Wooden board or canvas: Your art’s canvas; size depends on your project scale.
- Nails: Small, preferably with flat heads to secure the string in place.
- Hammer: For nailing.
- String: Cotton or wool in colors of your choice. Varied thicknesses add more texture.
- Pattern or design template: Optional, for complex designs.
- Scissors: For cutting the string.
Planning Your Design
Firstly, you have to select your pattern; for the beginners, shapes or simple pictures (such as a heart or a star) are advisable, while, for more experienced crafters, intricate patterns as well as silhouettes will be a suitable option.
- Sketch or print your design: Use paper the same size as your base.
- Choose colour schemes: Choose string colours that complement the colours of your room or theme.
- Plot your nail positions: The complexity of your design will determine how closely you want to space your nails.
Step 1: Prepare Your Base
Sand the wooden board and remove any rough edges. Paint the board a colour that contrasts or complements the colours of your string. Let it dry completely.
Step 2: Transfer Your Design
Put your template on the board, mark your nails with the pencil or hammer directly into the paper. Remove.
Step 3: Hammer the Nails
(With more experience, you can just wrap the wire around a dowel to complete the hills and dales design.) Hammer the nails into the edge of the board along your design line pattern – place the nails evenly (about ½ inch apart for beginning benders) and hammer them securely into the wood. Leave at least ½ inch of nail exposed to wrap the string.
Step 4: Stringing
- Attach your taut string to a starting nail
- A good payload for the line will be heavy enough to stretch the line taut but not heavy enough to snap it
- Tie a loop in your string just over your payload
- Attach your taut string to a second nail
- Tie the string around the head of each nail, in whatever pattern you’d like. For areas you’d like to emphasise, double or triple up the fabric with the string.
- Use a different colour by cutting it, and then tie another colour to the end of the first.
- Experiment with textures. Varying the string tension or layering strings can create interesting effects.
Step 5: Finishing Touches
Then, once you’re satisfied, you can add a little dab of glue to the end of your string and tie the two ends into a knot. If you want to make the knots extra-secure, do this before tying off the ends. Trim off any ends of the string.
Displaying Your Art
Pick a location with ample natural light so the textures and contrast in your piece play up the shadows. Frame it or hang it free-floating, depending on your style.
Tips for Success
‘When magicians want to seem invisible, they use illusions. When people with dark skin want to disappear, they just have to be there. Adapted from her soon-to-be-published novel Mother of the Furies (2019), this passage was originally written for a website concerned with racial discrimination called Octaroon (2015), edited by the website’s owner Robert Reid. One other strategy to enhance your existential awareness is to use metaphor as much as possible. Think of a metaphor as a vehicle that takes your ‘I’ on a journey to another part of experience. The origin and destination can be far apart, and the trip in-between can be bumpy, as the two are not inherently connected. This forced cross-referencing demands that the metaphor be repeatedly and carefully deliberated over. But it’s worth it. Time and time again, I’ve experienced the striking life-affirming power of metaphors as I contemplate them from different perspectives. Metaphors may even affirm the reality of being that is essential to existence, as a metaphor appears to be something other than what it actually is not. Metaphors often make plenteous use of literary (and non-literary) devices, which can be utilized to excellent effect in day-to-day situations. Here are a few to test-drive the next time you’re feeling existentially down. 1. Practice makes perfect: If you’re not satisfied with your first draft, start over. 2. Every dog has its day: Eventually, the trouble will pass as swiftly as it came.
- Lights make a difference: Getting the lighting right can make a big difference to the 3D effect in your string art.
- Personalize: Incorporate elements meaningful to you, like favorite colors or symbols.
Project 2: DIY Textured Spackle Wall Tiles
In this project, you’ll learn how to turn a common material used in patching walls – spackle – into a tool for home decoration, creating texture for wall tiles. Whether you want to add some class to your living room or pizzazz to your office, this project is a cheap and satisfying way to get it done.
Understanding Spackle as an Art Medium
Spackle, a texture that can be modelled and dries quickly, is a multipurpose canvas for creating textures. Once dry, it forms a lasting texture that can support complex designs, and can be formed into relatively thin yet shining textured wall tiles.
Materials You’ll Need
- Spackle compound: Ready-mixed spackle for ease of use.
- Acrylic or Latex primer: To prepare your base surface.
- Tiles: Ceramic or porcelain tiles serve as the canvas for your art.
- Palette knives and spatulas: For spreading and texturing the spackle.
- Stencils (optional): To create uniform designs or patterns.
- Paints and brushes: For adding color to your textured tiles.
- Sealant: To protect your finished tiles.
Designing Your Textured Tiles
First, select your tiles’ theme or primary design. Will you work with abstract textures or geometric designs? With plant-inspired motifs or organic forms? Plan out your desired look so that your tiles fit with the rest of the room where you’ll be hanging them, both stylistically and with regard to coordinating colours.
Step-by-Step Guide to Crafting Your Tiles
Step 1: Preparing Your Tiles
Begin on a clean, dry set of tiles. First of all: prime. You want the spackle to stick, and primer helps. Give it as much time to dry as it says on the primer. Cardboard can work really well. The thicker the better. Use cardboard caught in recycling. Cut it to size.
Step 2: Applying the Spackle
Use either a palette knife or a spatula to haphazardly smear a layer of spackle on to the tile (varied levels of thickness will yield different surface depths during the sanding process). Or, if you’re more of a purist, use your stencil as a guideline.
Step 3: Texturing
The fun really begins once your textures are formed. Work your spackle with these tools to create your textures. Spackle made for mud coat makes great textures that won’t wash out from any water; other brands could be washed off by rain or hose-paddling so beware with those. Using combs, feathers, brushes, homemade stamps and any old antiquated tools you can find at flea markets or your shed, press patterns into your damp spackle. Work fast because the spackle does dry quickly. But it doesn’t have to be perfect; many of my grooves are irregular and that’s great. You’re going for character here.
Step 4: Drying
Let the spackle dry completely, which can take several hours or overnight, depending on how thickly you applied it and how humid your home is.
Step 5: Painting
After the spackle has dried, paint them. Pick up acrylic/latex paints, as they are inexpensive, come in a wide variety of colours, and are easy to use. Explore techniques such as dry brushing (which gives a built-up effect that highlights textures) and layering to create depth. For a more creative effect, mix your paint right into the spackle – mix two parts paint to one part spackle.
Step 6: Sealing
Seal the painted tiles with a clear sealant, so they won’t degrade in wet and humid surroundings; you’ll definitely want to do that if you are using them in a bathroom or other high-humidity location.
Installation Tips
- Plan your layout: Instead of sticking your tiles on the wall and discovering it’s a disaster, plan the final layout on the floor before you start.
- Use the right adhesive: You need one that is tough enough to hold your tiles up, but that will also enable you to take your tiles down if you want to move.
- Grouting: Only use grout if you’re laying your tiles in a standard tiled pattern. If so, you could have coloured grout, which can blend in beautifully with your tiles, or contrast for full impact.
Tips for Success
- Rough it out: first learn your texturing and painting techniques on a test sample or two before you start working on your masterpieces.
- Stay Safe: Wear gloves when handling spackle and work in a well-ventilated area.
- Be Patient: Allow ample drying time at every stage to ensure the best results.
 Project 3: A Guide to DIY Layered Paper Art
This project is perfect for beginner as well as the advanced crafter. It’s a simple method of creating dimension, texture and color through the process of layering paper! No need to be super creative to make a beautiful piece for your home, to gift or just for the sheer joy of making it! You’ll be able to create your own layered paper Art pretty soon. This is a step by step guide that will lead you through each step.
The Charm of Layered Paper Art
The depth of details, shadows within shadows, and the illusion of dimension created in layered paper art tell a story in a way that flat art cannot. Layers accumulate to create meanings beyond the sum of their parts. The raw aesthetic materiality of layered paper allows for infinite experimentation along the three axes of materialities, themes and techniques; its possibilities are boundless, and every piece is testament to the constantly renewed serendipities of paper.
Materials You’ll Need
- Different coloured card hardware: You can get into many colours of cardstock nicely textured.
- Craft Knife or Scissors: For precise cutting of intricate designs.
- Cutting Mat: Protects your surfaces when cutting.
- Glue or Double-Sided Tape: To assemble your layers without adding bulk.
- Frame: To display your finished artwork.
- Design Template (Optional): For those who prefer a guide.
Planning Your Design
This layered paper art relies on the power of design. You can design your own, or you can find templates online. Themes can range from minimal abstract geometric forms to intricate landscapes or portraits. Here arc some things to bear in mind in your planning:
- Colour Scheme: Use colour combinations that will reflect well together, should match the aesthetic of the space in which it will hang.
- Depth: decide how many layers there will be in your piece. Each additional layer will make the piece more complex but also harder to execute.
- Detail Level: Detailed designs can be stunning but require patience and precision.
Step 1: Design Preparation
If you’re working from a template, print it out. Otherwise, plan your design by sketching it out on paper. Decide what will go in each layer – background elements go on the bottom layers, while details that you’d like to jump out should go at the top.
Step 2: Cutting Your Layers
Transfer your design on to your paper, using a lightbox or by tracing. For small, intricate designs, a craft knife is the best tool for the job. Be patient and keep your fingers still while you are cutting. It is wise to cut on a mat so you don’t damage your surface.
Step 3: Assembling Your Artwork
Begin assembling the layers from the bottom up, putting tiny dots of glue or bits of double-sided tape on the back of each so that the paper doesn’t warp and so that future edits to the animation can be made by removing and replacing a single layer. Then position each layer and be sure that your design is aligned across the layers.
Step 4: Adding Depth
Leave it plain or add a thin layer of small foam spacers between every layer. This will create more of a 3D effect, deepening the shadows and helping layers look more layered. This step is sideways.
Step 5: Framing
Once complete, display your layered paper art in a frame. A shadow box frame retains the layers’ dimensionality or thickness, keeping them from pressing flat against glass.
Tips for Success
- Sharp Blades: Make sure that your craft knife has a sharp blade. A dull blade will tear the paper and not cut it off as precisely.
- Light Layers: Be conservative with glue to prevent the paper from buckling.
- Practice: Try your hand at a smaller project before diving into a more complicated design.
Conclusion
DIY textured wall art – such as those shared in this article – is a great way to customise your own space, making it feel really like home, and it’s a fairly accessible and enjoyable activity to engage in your spare time. With these three simple projects, you’ll not only make beautiful, modern, minimalist artworks but, most of all, you’ll get a real sense of achievement and actually enjoy making it – all of which will really enhance your living environment. Get stuck in, experiment with materials, and happy creating.
What I am suggesting by telling you about my textured art projects is that when you create and display art yourself in your home, it will not only save money, it will also allow you to gain control of your surroundings and make them your own. You, as an individual, get to brand your environment with gorgeous art (the quality of which is better than what you could get for the money at a shop or online anyway) all because you took the time to be creative. Your walls can be the envy of your friends and neighbours.